Helpcentrum Help Center
Vind antwoorden op veelgestelde vragen over CryptoFiscaal. Find answers to frequently asked questions about CryptoFiscaal.
Je kunt crypto op drie manieren toevoegen:
- Handmatig — voer elke munt en hoeveelheid zelf in via het scherm of via een CSV.
- CSV import — upload een exportbestand van je exchange.
- Exchange koppeling — verbind je exchange via een API-sleutel (Basis of Pro abonnement vereist).
You can add crypto in three ways:
- Manually — enter each coin and amount yourself in the site or via CSV.
- CSV import — upload an export file from your exchange.
- Exchange connection — connect your exchange via API key (Basic or Pro plan required).
De app ondersteunt:
- Particulier — bezit crypto's (Box 3)
Mogelijke ondersteuning in de toekomst:
- Particulier — minen of handelen (Box 1)
- Particulier — loon in crypto's
- Ondernemer (IB) — betaald in crypto's
- Ondernemer (OB) — BTW aspecten
- BV — betaald in crypto's
- BV — minet en handelt in crypto's
The app supports:
- Individual — holds crypto (Box 3)
Future support topics:
- Individual — mining or trading (Box 1)
- Individual — salary in crypto
- Entrepreneur (income tax) — paid in crypto
- Entrepreneur (VAT) — VAT aspects
- Corporation — paid in crypto
- Corporation — mines and trades crypto
Soms kan CryptoFiscaal de prijs van een munt niet automatisch ophalen via CoinGecko. Volg dan deze stappen:
- Druk op Berekenen — het scherm toont precies welke prijzen ontbreken.
- Voer op die plekken de prijs handmatig in.
- Het rapport wordt direct aangemaakt zodra alle ontbrekende prijzen zijn ingevuld.
Let op: handmatig ingevoerde prijzen worden niet opgeslagen en moeten bij een volgende berekening opnieuw worden ingevoerd.
Sometimes CryptoFiscaal cannot automatically fetch the price of a coin via CoinGecko. Follow these steps:
- Click Calculate — the screen will show exactly which prices are missing.
- Enter the missing price(s) manually on those spots.
- The report is generated immediately once all missing prices have been filled in.
Note: manually entered prices are not saved and will need to be entered again for future calculations.
Wanneer je handmatig een synchronisatie start voor een beursverbinding, geldt er een korte wachttijd voordat je opnieuw kunt synchroniseren. Dit voorkomt dat je API-sleutels de limieten van de beurs bereiken en zorgt ervoor dat achtergrondtaken niet opstapelen.
De wachttijd is afhankelijk van je abonnement:
| Abonnement | Wachttijd |
|---|---|
| Gratis | 30 minuten |
| Basis | 15 minuten |
| Pro | 10 minuten |
| Hoog Volume | 5 minuten |
Zolang een verbinding in de wachttijd zit, zie je een afteltimer ernaast. Zodra de timer op nul staat, is de synchronisatieknop weer beschikbaar. De wachttijd geldt per verbinding — het synchroniseren van één beurs heeft geen invloed op de wachttijd van een andere.
When you manually trigger a sync for an exchange connection, CryptoFiscaal places a short cooldown on that connection before you can sync it again. This prevents your exchange API keys from hitting rate limits and keeps background jobs from piling up.
The cooldown length depends on your subscription plan:
| Plan | Cooldown |
|---|---|
| Free | 30 minutes |
| Basic | 15 minutes |
| Pro | 10 minutes |
| High Volume | 5 minutes |
While a connection is cooling down, a countdown timer is shown next to it. Once the timer reaches zero, the sync button becomes available again. The cooldown is per connection — syncing one exchange does not affect the cooldown on another.
API-sleutels instellen per exchange Setting up API keys per exchange
Volg de stap-voor-stap handleiding voor jouw exchange om je API-sleutel aan te maken met alleen-lezen rechten. Follow the step-by-step guide for your exchange to create an API key with read-only permissions.
Belangrijk: Stel altijd uitsluitend alleen-lezen rechten in. Geef nooit handels- of opnamerechten weg. Important: Always set read-only permissions. Never grant trading or withdrawal rights.
Navigeer naar de API-instellingen Navigate to the API settings
- Ga naar bitvavo.com en log in op je account.
- Klik rechtsboven op je naam.
- Kies Instellingen uit het dropdownmenu.
- Selecteer de tab API in het instellingenmenu.
- Go to bitvavo.com and log in to your account.
- Click on your name in the top right.
- Choose Settings from the dropdown menu.
- Select the API tab in the settings menu.
Maak een nieuwe API-sleutel aan Create a new API key
- Klik op de knop Nieuwe API-sleutel toevoegen.
- Accepteer de waarschuwing over het delen van sleutels (dit moet je uiteraard nooit doen).
- Geef de sleutel een herkenbare naam, bijv. "CryptoFiscaal".
- Zet alleen de slider voor Weergave aan. Laat alle andere sliders uit.
- Klik op API-sleutel genereren.
- Click the Add new API key button.
- Accept the warning about sharing keys (which you should of course never do).
- Give the key a recognisable name, e.g. "CryptoFiscaal".
- Enable only the View slider. Leave all other sliders off.
- Click Generate API key.
Als je tweestapsverificatie (2FA) hebt ingesteld, wordt om een extra bevestiging gevraagd.
Daarna verschijnt er een popup met je API-sleutel en API-secret.
If you have two-factor authentication (2FA) enabled, you will be asked for an extra confirmation.
A popup will then appear with your API key and API secret.
Let op: de API-sleutel en het API-secret worden slechts één keer getoond. Kopieer ze en sla ze veilig op voordat je het venster sluit. Note: the API key and API secret are shown only once. Copy and save them securely before closing the window.
Bevestig via e-mail en voer in bij CryptoFiscaal Confirm via email and enter in CryptoFiscaal
- Je ontvangt een e-mail van Bitvavo om de API-sleutel te bevestigen. Klik op de bevestigingslink.
- Je API-sleutel is nu actief en zichtbaar in de API-tab.
- Ga naar CryptoFiscaal en voer de API-sleutel en het API-secret in bij de Bitvavo koppeling.
- You will receive an email from Bitvavo to confirm the API key. Click the confirmation link.
- Your API key is now active and visible in the API tab.
- Go to CryptoFiscaal and enter the API key and API secret in the Bitvavo connection.
Vereiste rechten Required permissions
Belangrijk: Stel altijd uitsluitend alleen-lezen rechten in. Geef nooit handels- of opnamerechten weg. Je hebt voor Kraken API-toegang een Kraken Pro account nodig. Important: Always set read-only permissions. Never grant trading or withdrawal rights. Kraken API access requires a Kraken Pro account.
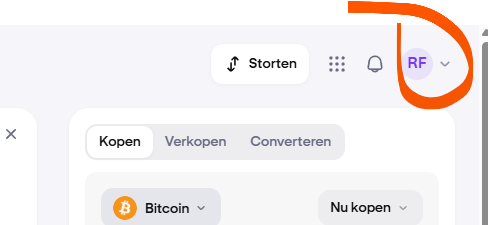
Navigeer naar je account Navigate to your account
- Ga naar kraken.com en log in op je account.
- Klik rechtsboven op het gebruikerslogo.
- Kies Account uit het menu.
- Go to kraken.com and log in to your account.
- Click on the user logo in the top right.
- Choose Account from the menu.
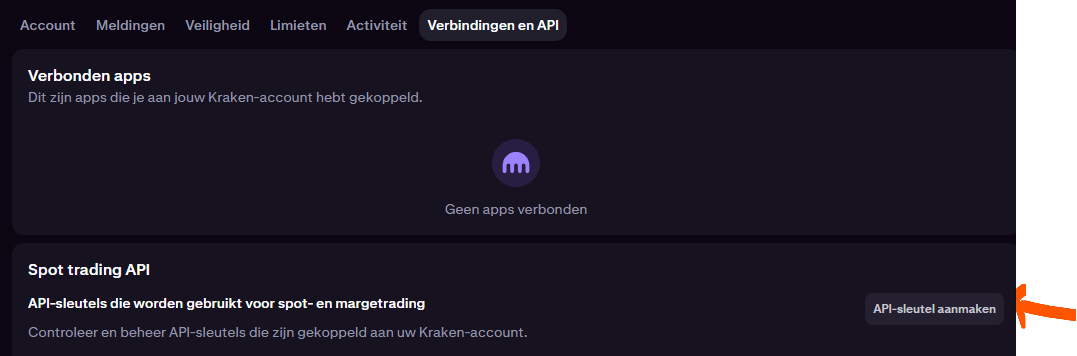
Ga naar Verbindingen & API Go to Connections & API
- Kies de optie Verbindingen en API.
- Choose the option Connections and API.
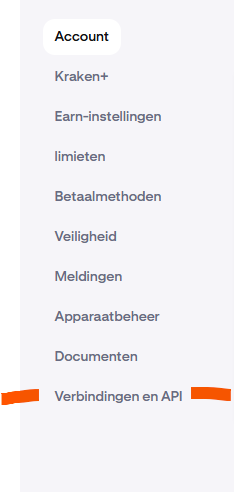
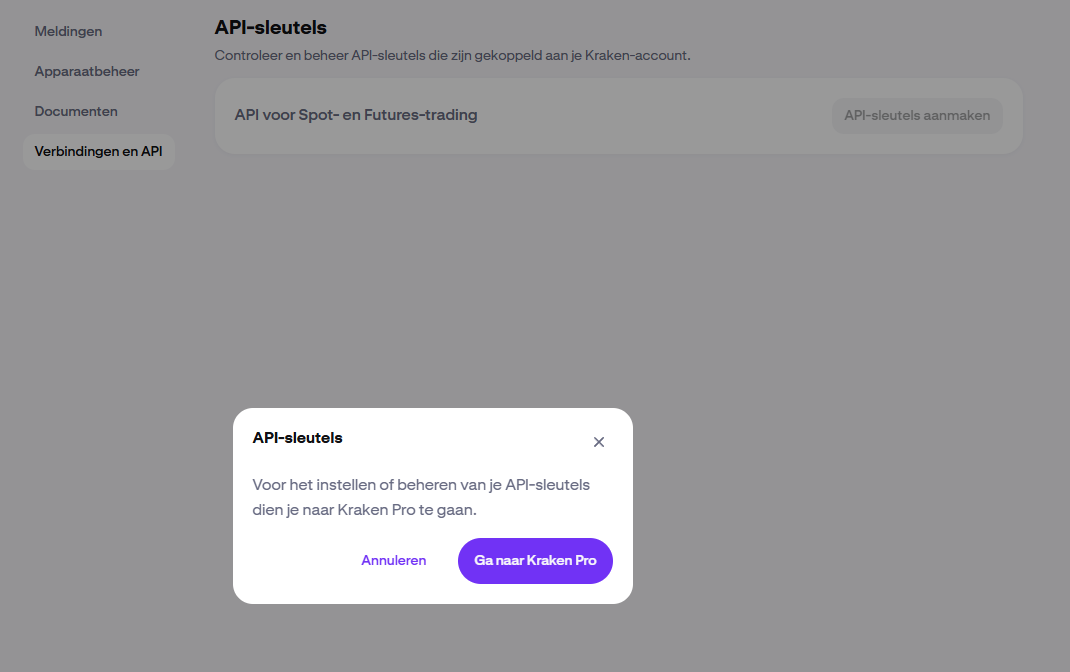
- Kies API-sleutels aanmaken.
- Choose Create API keys.

- Je ziet een melding dat je naar Kraken Pro moet gaan. Accepteer de melding en ga door naar Kraken Pro.
- You will see a notice that you need to go to Kraken Pro. Accept the notice and continue to Kraken Pro.
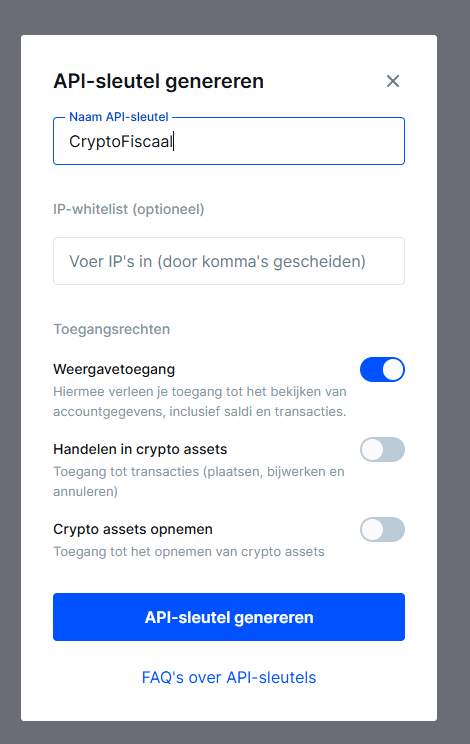
Maak een API-sleutel aan in Kraken Pro Create an API key in Kraken Pro
- Klik op de knop API-sleutel aanmaken.
- Click the Create API key button.
- Geef de sleutel een herkenbare naam, bijv. "CryptoFiscaal".
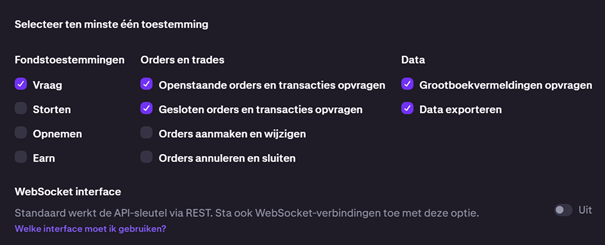
- Selecteer uitsluitend de rechten zoals aangegeven in de onderstaande afbeelding en het permissieoverzicht. Laat alle overige opties uitgeschakeld.
- Klik op Sleutel genereren.
- Give the key a recognisable name, e.g. "CryptoFiscaal".
- Select only the permissions shown in the screenshot below and the permissions overview. Leave all other options disabled.
- Click Generate key.
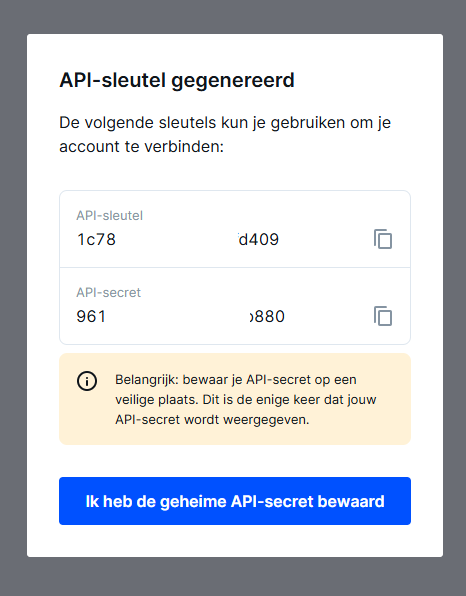
Als je tweestapsverificatie (2FA) hebt ingesteld, wordt om een extra bevestiging gevraagd.
Daarna verschijnt er een popup met je API-sleutel en Privésleutel.
If you have two-factor authentication (2FA) enabled, you will be asked for an extra confirmation.
A popup will then appear with your API key and Private key.
Let op: de API-sleutel en de Privésleutel worden slechts één keer getoond. Kopieer ze en sla ze veilig op voordat je het venster sluit. Note: the API key and Private key are shown only once. Copy and save them securely before closing the window.
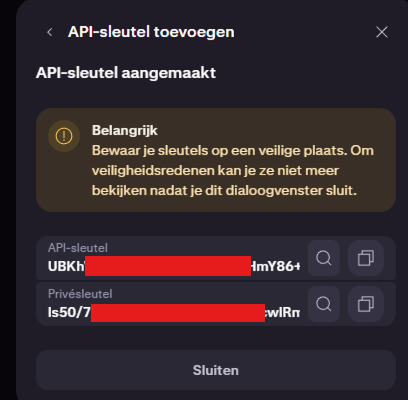
- Sluit het venster nadat je de sleutels hebt opgeslagen. De sleutel is nu zichtbaar in het overzicht.
- Ga naar CryptoFiscaal en voer de API-sleutel en de Privésleutel in bij de Kraken koppeling.
- Close the window after saving the keys. The key is now visible in the overview.
- Go to CryptoFiscaal and enter the API key and Private key in the Kraken connection.
Vereiste rechten Required permissions
Fondstoestemmingen Fund permissions
Orders en trades Orders and trades
Data
Belangrijk: Vink uitsluitend de View-opties aan. Geef nooit Trade-, Transfer- of Withdraw-rechten weg. Important: Only tick the View options. Never grant Trade, Transfer, or Withdraw rights.
Navigeer naar API-beheer Navigate to API Management
- Ga naar mexc.com en log in.
- Klik rechtsboven op het gebruikerslogo.
- Kies API-Management uit het menu.
- Go to mexc.com and log in.
- Click on the user logo in the top right.
- Choose API Management from the menu.
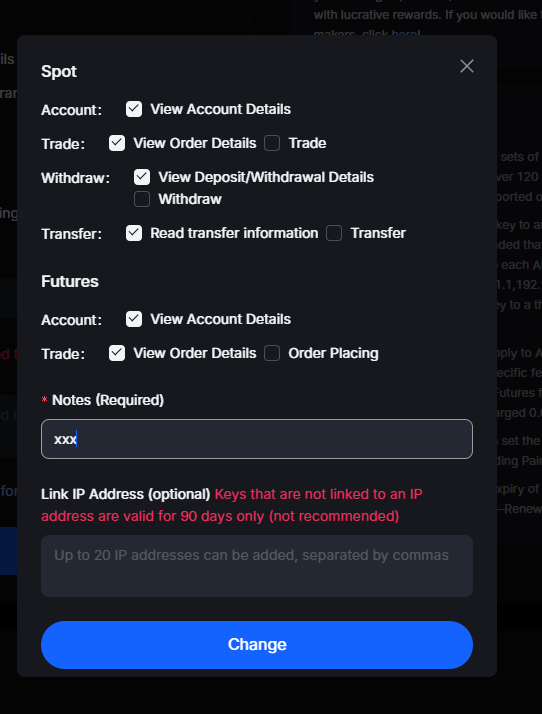
Stel de rechten in en maak de sleutel aan Configure permissions and create the key
- Vul de waarden in zoals aangegeven in het screenshot hieronder.
- Klik op Aanmaken (Create).
- Voltooi de verificatie via e-mail en 2FA indien ingesteld.
- Je krijgt een popup met je API-sleutel en Privésleutel — sla ze direct op.
- Sluit het venster. Je API-sleutel is nu zichtbaar in het overzicht.
- Voer de sleutels in bij de MEXC-koppeling in CryptoFiscaal.
- Fill in the values as shown in the screenshot below.
- Click Create.
- Complete verification via email and 2FA if enabled.
- A popup will appear with your API key and Secret key — save them immediately.
- Close the window. Your API key is now visible in the overview.
- Enter the keys in the MEXC connection in CryptoFiscaal.
Let op: de API-sleutel en Privésleutel worden slechts één keer getoond. Kopieer ze en sla ze veilig op voordat je het venster sluit. Note: the API key and Secret key are shown only once. Copy and save them securely before closing the window.
Vereiste rechten Required permissions
SPOT
Account
Trade
Opnemen Withdraw
Transfer
FUTURES
Account
Trade
Handelsgeschiedenis exporteren als CSV Exporting trade history as CSV
Volg de stap-voor-stap handleiding voor jouw exchange om je transactiegeschiedenis te exporteren en in te laden in CryptoFiscaal. Follow the step-by-step guide for your exchange to export your transaction history and import it into CryptoFiscaal.
MEXC exporteert je handelsgeschiedenis als Excel-bestand (.xlsx). Je zet dit zelf even om naar een CSV-bestand voordat je het inlaadt in CryptoFiscaal. MEXC exports your trade history as an Excel file (.xlsx). You will need to convert this to a CSV file before importing it into CryptoFiscaal.
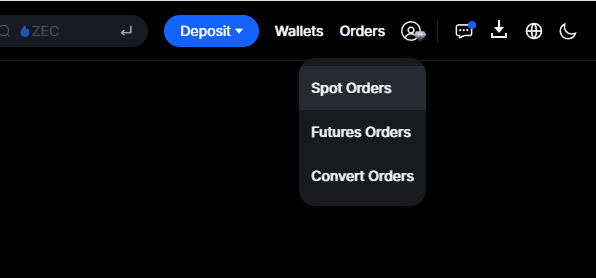
Navigeer naar Spot Orders Navigate to Spot Orders
- Ga naar mexc.com en log in.
- Klik rechtsboven op Orders en kies vervolgens Spot Orders.
- Go to mexc.com and log in.
- Click Orders in the top right and choose Spot Orders.
- Kies het tabblad Handelsgeschiedenis (Trade History).
- Select the Trade History tab.
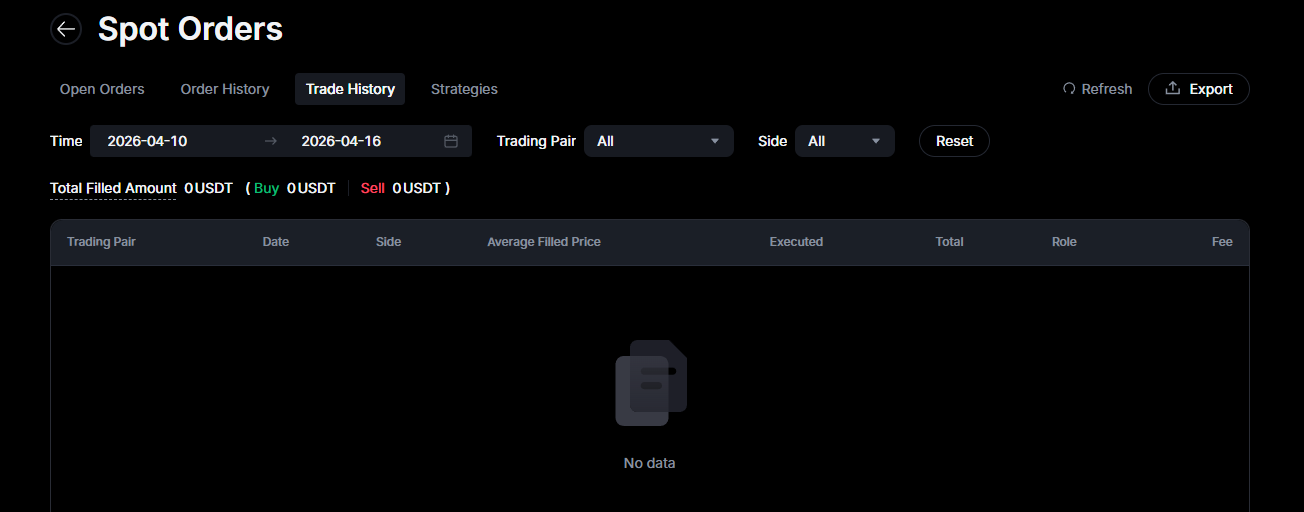
Exporteer per jaar Export per year
- Klik rechts op de knop Exporteren.
- Selecteer een periode van maximaal 1 jaar. Begin vanaf het jaar dat je je account hebt aangemaakt.
- Click the Export button on the right.
- Select a period of at most 1 year. Start from the year you created your account.
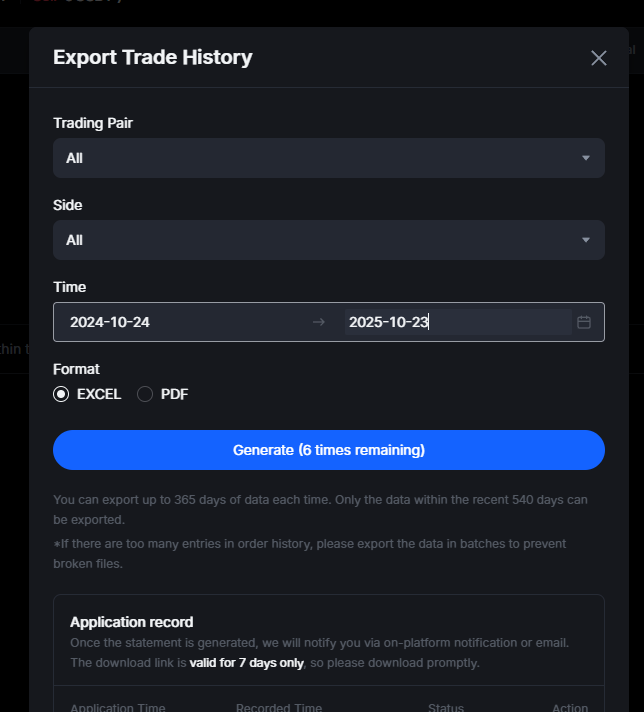
- Klik op Genereren. MEXC staat een beperkt aantal exports per periode toe.
- Na een korte wachttijd kun je het bestand downloaden.
- Click Generate. MEXC allows a limited number of exports per period.
- After a short wait you can download the file.
- Herhaal dit voor elk jaar dat je actief was op MEXC. Bewaar je bestanden voor een volgend belastingjaar!
- Repeat for every year you were active on MEXC. Keep your files for the next tax year!
Zet .xlsx om naar CSV en laad in Convert .xlsx to CSV and import
- Open het gedownloade .xlsx-bestand in Excel (of Google Spreadsheets).
- Kies Bestand → Opslaan als en selecteer het formaat CSV (Comma Separated Values).
- Ga naar CryptoFiscaal en upload het CSV-bestand via de MEXC CSV-koppeling.
- Open the downloaded .xlsx file in Excel (or Google Sheets).
- Choose File → Save As and select the CSV (Comma Separated Values) format.
- Go to CryptoFiscaal and upload the CSV file via the MEXC CSV connection.
Let op: de gedownloade bestanden zijn .xlsx-bestanden. Je moet ze zelf openen in Excel en opslaan als CSV voordat je ze kunt inladen in CryptoFiscaal. Note: the downloaded files are .xlsx files. You must open them in Excel and save them as CSV before you can import them into CryptoFiscaal.
Nog vragen? Still have questions?
Staat je vraag er niet bij? Neem dan contact met ons op via e-mail. Can't find your answer? Get in touch with us by email.
support@cryptofiscaal.eu